My (nearly) perfect todo system
In the twilight of my career, I finally developed the (nearly) perfect todo system.
Introduction
I’m grateful for a full and complicated life with many responsibilities at home, at work, in my research community, and at church. It can be a lot of work to keep it straight, and tasks come at me from all directions! Most of my todo items arrive via email from colleagues, collaborators, students, family, or friends. Other todo items originate from brainstorms at all hours of the day or night. Some todo items emerge as I perform household chores, compose emails, browse the web, write proposals, or work on papers.
I use multiple Macs as my primary computing devices. I also use an Apple Watch, an iPhone, and an iPad. I always wanted a todo system on the Apple platforms that provides both (a) fast capture1 and (b) links among a todo item, its originating artifact, and any resources needed to complete it. Fast capture is essential, ensuring that no tasks are forgotten. Links are time-savers, eliminating navigation through the file system.
On the Mac, use of the mouse works against speed, so I want keyboard navigation for everything: capture, adding metadata to a todo item, navigating from a todo item to its resources, navigating from resources to their todo item, and marking the task as complete.
Now that I finally figured it out, I’m sharing my system in this post, hoping others will benefit. Below, I provide my requirements, introduce the apps I use, show how to configure those apps, and describe some productive workflows. Let’s start with the requirements.
Requirements
Thinking like the engineer that I am, the design requirements for my ideal todo system are given below.
- Capture must be lightening quick and occur when and where the task first appears.
- Input must be possible by both typing and speaking, equally easy with each
- All todo items must be visible on Mac, iPad, and iPhone.
- Each new todo item must provide a connection to its originating email or document (if one exists) with no extra effort.
- It must be possible to connect each todo item with additional resources needed to complete it.
- The database of todo items must be viewable in many “slices,” such as by start dates, by due dates, by areas of life, or by projects within those areas.
I have struggled for years to find a system that meets all requirements. Apple’s Reminders apps meet requirements 1–3 but fail on 4–6. I bounce off note-taking apps like Obsidian, NotePlan, and Logseq; they’re too fiddly. Zettelkasten isn’t fit for the purpose of managing dozens of small, unrelated items that emerge daily from classes, committees, research projects, and family. So I built my own todo system from a suite of apps made by incredible developers.
The key to establishing my ideal todo system was separating todos from both calendaring2 and note taking3. Calendar items are appointments with precise start and end times, usually an hour or less in duration. In contrast, the start and end times for todos can be several days or weeks apart. Notes are long (several pages). Todos, on the other hand, are short (a few words).
Let’s talk about the apps.
Apps
My perfect todo system is built upon four interconnecting apps: Things, Hyperkey, Reminders, and Hookmark.
Things is at the core of my perfect todo system, providing the database of todos, viewable in various slices on all platforms. Things achieves requirements 3 and 6. Hyperkey provides conflict-free keyboard shortcuts on the Mac, meeting requirement 1. Hookmark provides links among todo items and other files in the macOS file system, accomplishing requirements 4 and 5. Reminders provides fast capture via both typing and speaking, fulfilling requirement 2.
Things
Things is an elegant todo manager that serves as the repository of tasks in my (nearly) perfect todo system. It enables different views of tasks. Each “slice” of the Things database is available with a lightning-fast keyboard shortcut. Furthermore, Things can be configured to import tasks from Reminders.
I use the following keyboard shortcuts extensively in Things:
| Command | Description |
|---|---|
| ⌘1 | The Inbox containing imports from Reminders and forwarded emails. |
| ⌘2 | Today’s tasks, organized by project. |
| ⌘3 | Upcoming todos and calendar appointments, organized by days. |
| ⌘4 | Tasks with a start date, organized by project. |
| ⌘5 | Tasks without a start date, organized by project. |
| ⌘K | Mark a task complete. |
| ⇧⌘Y | Log all completed tasks (send to archive). |
Hyperkey
A hyperkey invokes a new mode of operation for a computer. On the Mac, the command key (⌘) serves as a hyperkey. For example, ⌘S saves your document instead of typing the letter “s”. The first hyperkey appeared on the Space-cadet keyboard in 1978. On the Mac, use of a hyperkey has been popularized by David Sparks and Brett Terpstra.
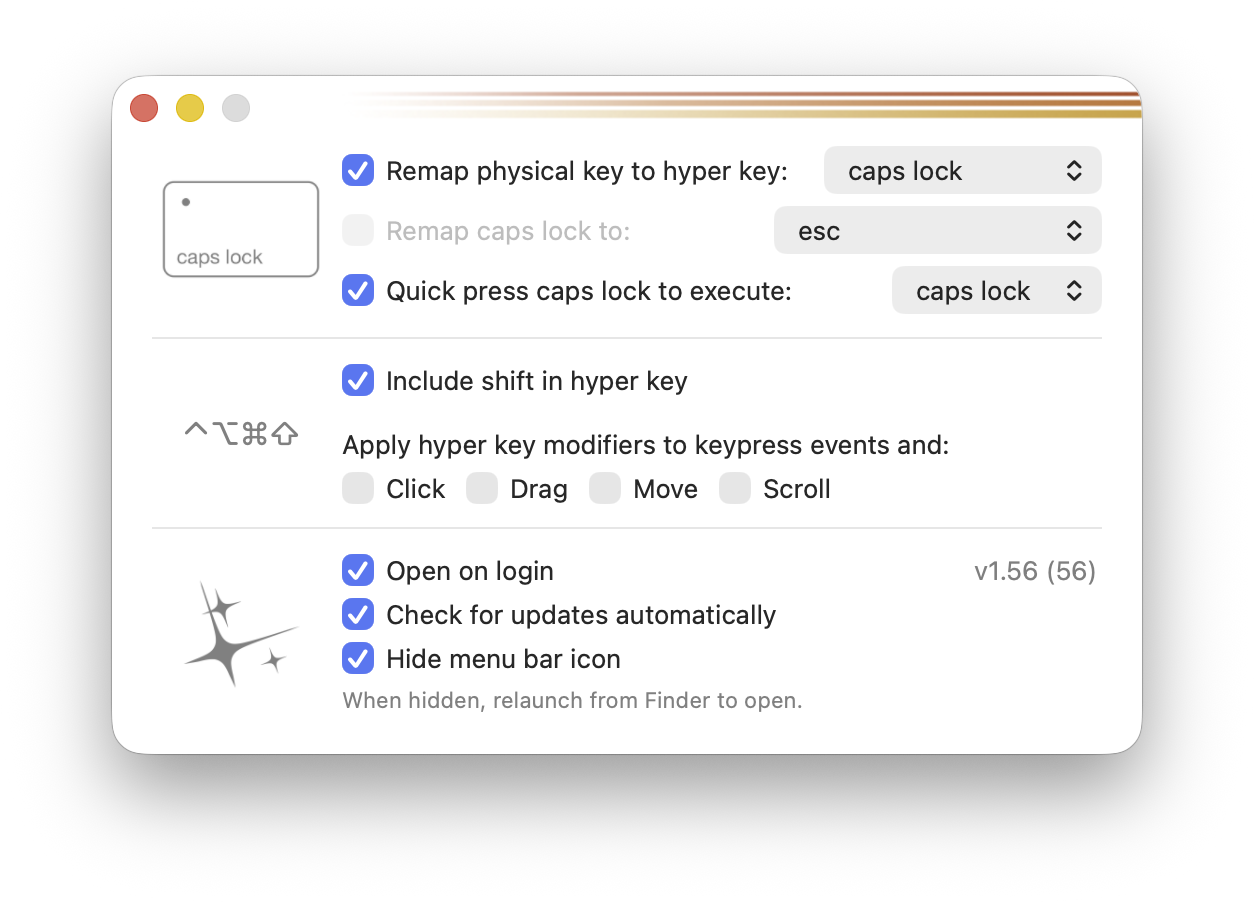
True to its name, the Hyperkey app gives the Mac another hyperkey. Hyperkey tells the system that all of ⌃⌥⇧⌘ are pressed when the caps-lock key (⇪) is typed4. Thankfully, no apps expect users to hold down all of ⌃⌥⇧⌘ simultaneously. (Try doing that with your left hand!) Thus, Hyperkey enables a new set of bespoke, system-wide keyboard shortcuts that pose no conflicts with existing apps.
In my todo system, I use Hyperkey as follows:
| Command | Description |
|---|---|
| ⇪N | Create a new todo item with a bi-directional hook to the frontmost document, folder, or todo item. |
| ⇪C | Copy a bi-directional hook to the frontmost or selected document, folder, or todo item. |
| ⇪V | Paste a bi-directional hook between the item on which ⇪C was previously invoked and the todo item I’m creating, the document I’m editing, or the folder I’m viewing in the Finder. |
| ⇪H | See all items (todos, documents, folder, calendar events, etc.) linked (hooked) to the present item. |
⇪N is meant to evoke the keyboard shortcut for a new document (⌘N). ⇪C and ⇪V are akin to the copy and paste shortcuts (⌘C and ⌘V) that date back to the original Macintosh. ⇪H is a mnemonic for “hook,” a bi-directional link between two items.
Reminders
Apple’s Reminders apps are packaged with the system software on Mac, iPad, iPhone, and Apple Watch. They are perfectly “beige,” as my daughter would say. Their one advantage is deep integration with their respective systems.
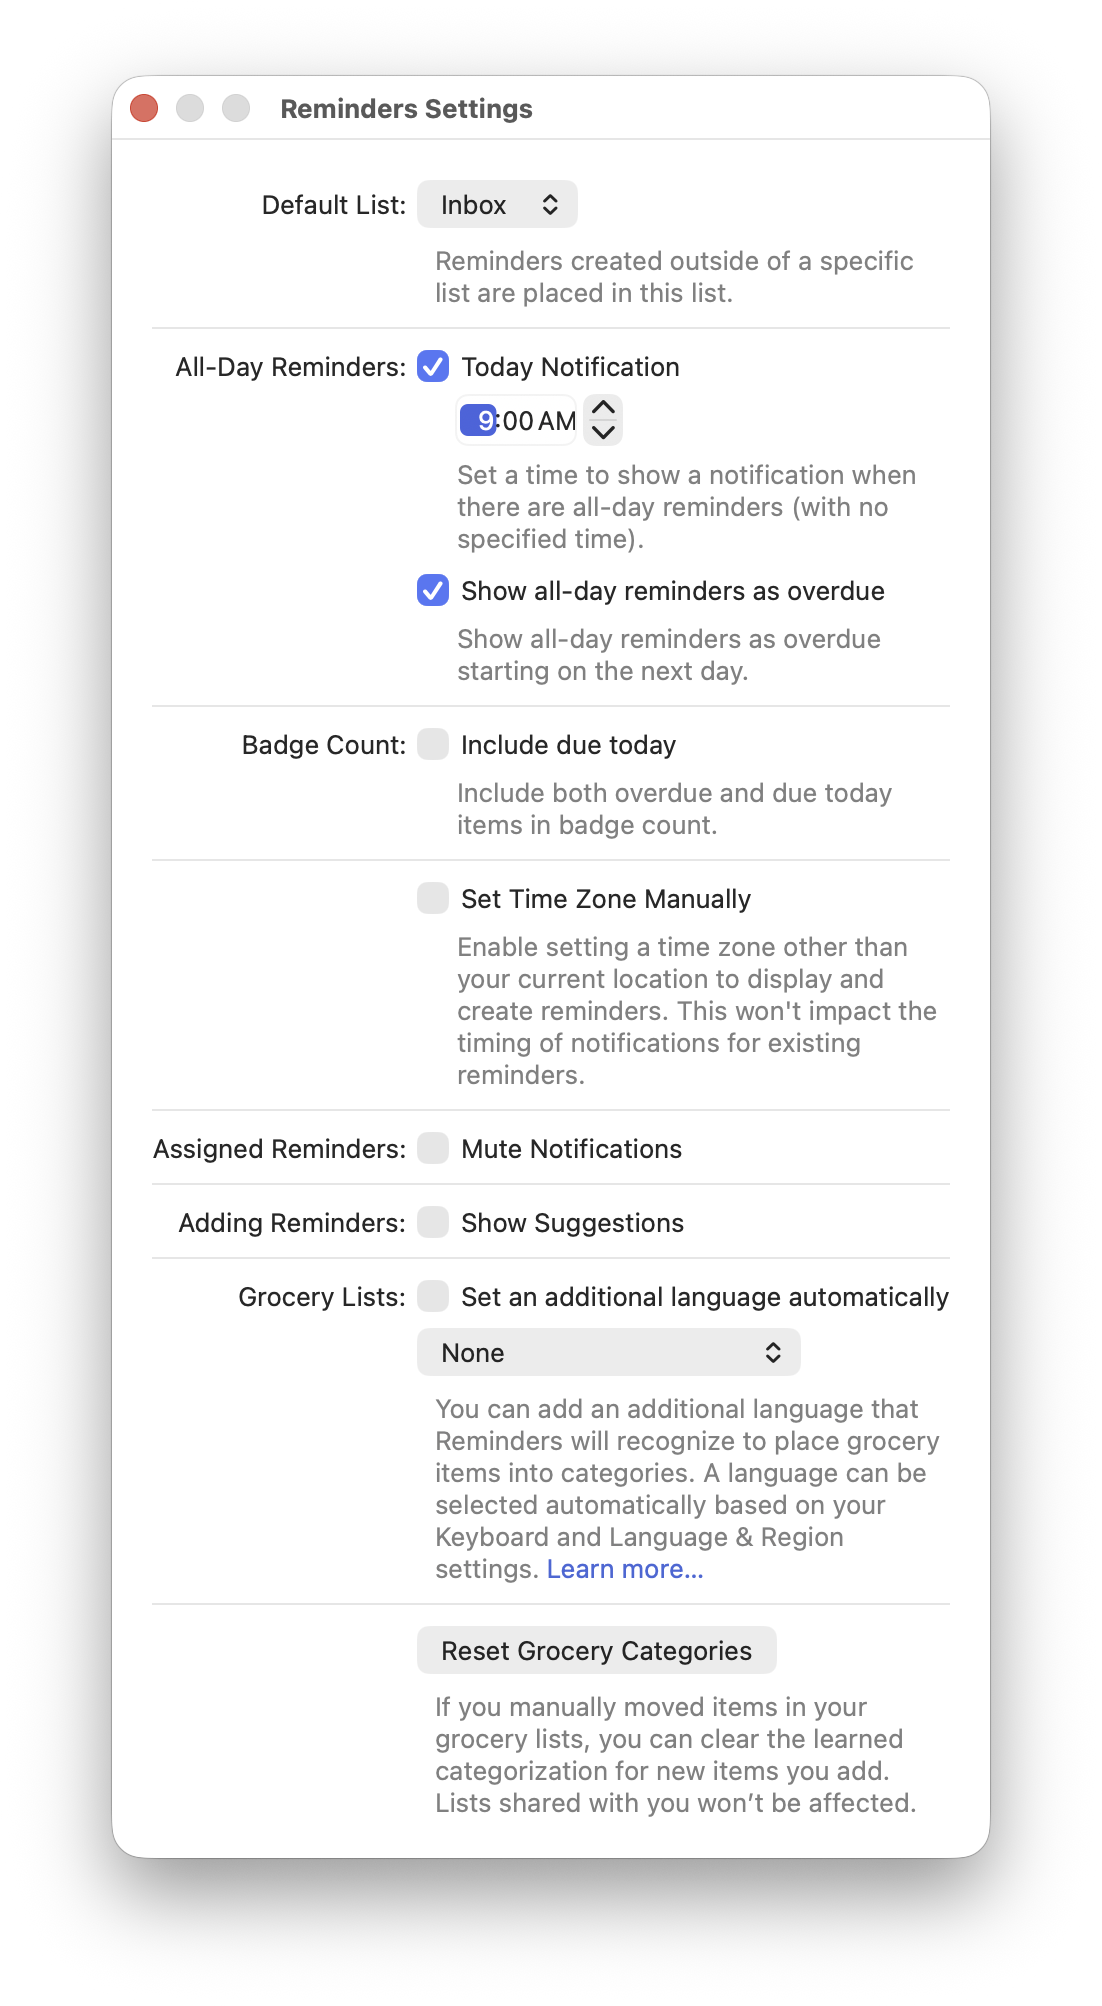
I don’t use the Reminders apps as the database for my todo system. Things does that job. Rather, the Reminders’ integrations enable quick capture of todo items, especially via dictation to my iPhone or Apple Watch. I configure Reminders to place dictated todo items into the Inbox, where they can be imported easily to Things. More on the Reminders configuration below.
Hookmark
Hookmark is an innovative app that connects documents, folders, and other resources on a Mac. The hookmark developer, Luc Beaudoin, is passionate about reducing time spent navigating through the file system. If you can jump from one related document to another with a few keystrokes (instead of mousing through the file system), your train of thought stays on its tracks. For example, Hookmark provides keystroke access from a report to the spreadsheet that contains its data.
Hookmark’s role in my (nearly) perfect todo system is bi-directional linking (hooking) todo items to the resources needed to complete the task. For example, Hookmark provides a link from the todo item “Print Laura’s email and add to my Thank You folder” to Laura’s email. When I decide to work on that task, I’m usually looking at the todo item in Things. I use the hook to jump from Things to the message I need to print, eliminating the need to switch to my email app and search for the message from Laura. The message just pops open when I follow the link! After I print the email, I use the hook to go back to the task in Things to mark it as complete.
Configuring the apps
Things
I configure Things to sync across all my devices by turning on Things’ Cloud sync. On the Mac, it looks like this:
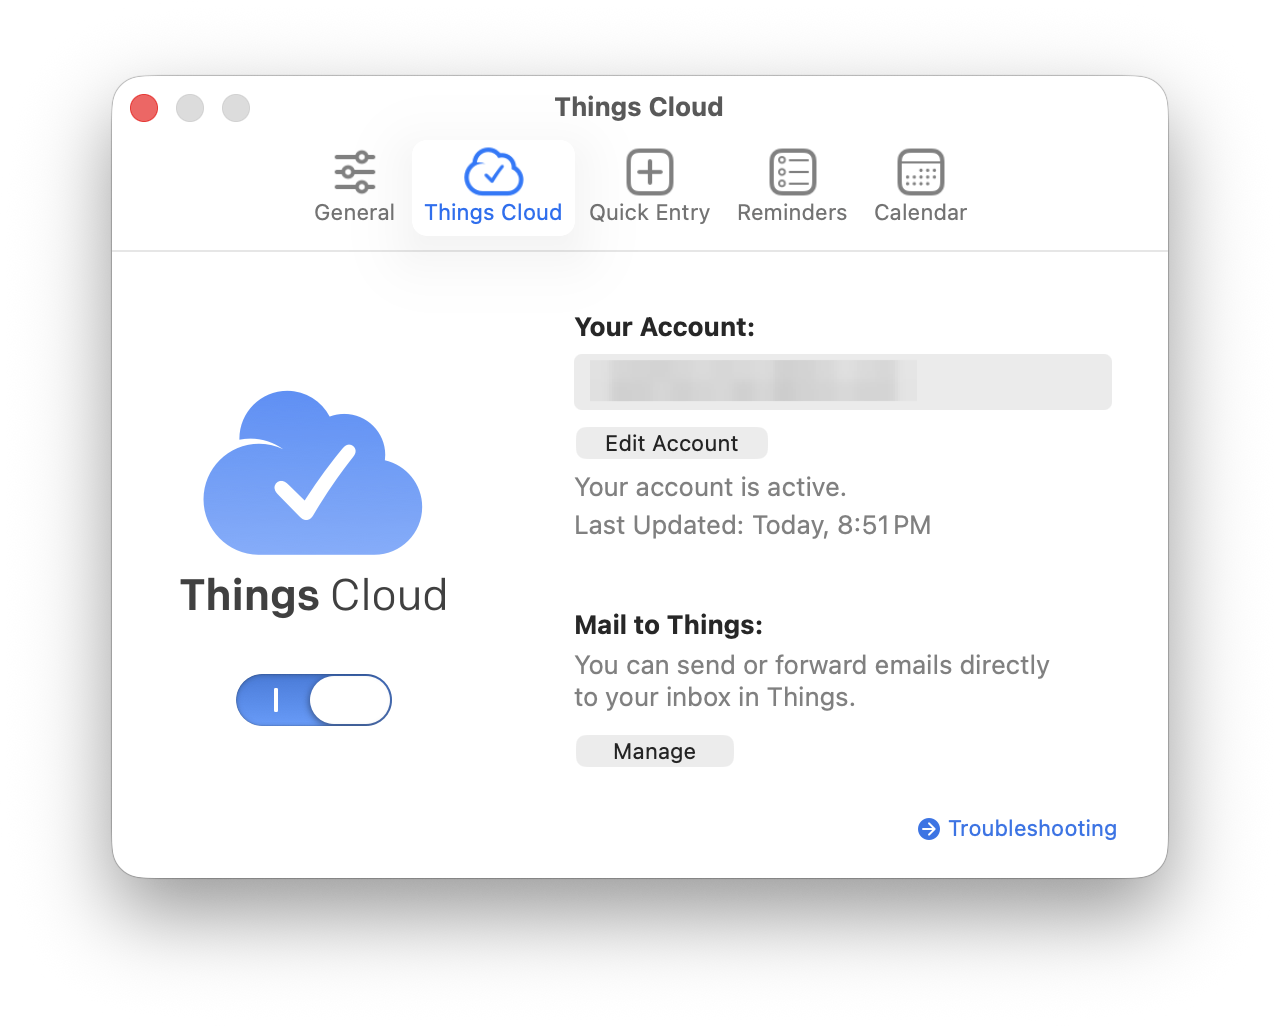
In the same panel of Things’ preferences, configure Mail to Things, too. I add the Things email address to my contacts database under the name “Things email.” See below for a workflow to use this feature of Things.
Configure quick-entry for Things like this:
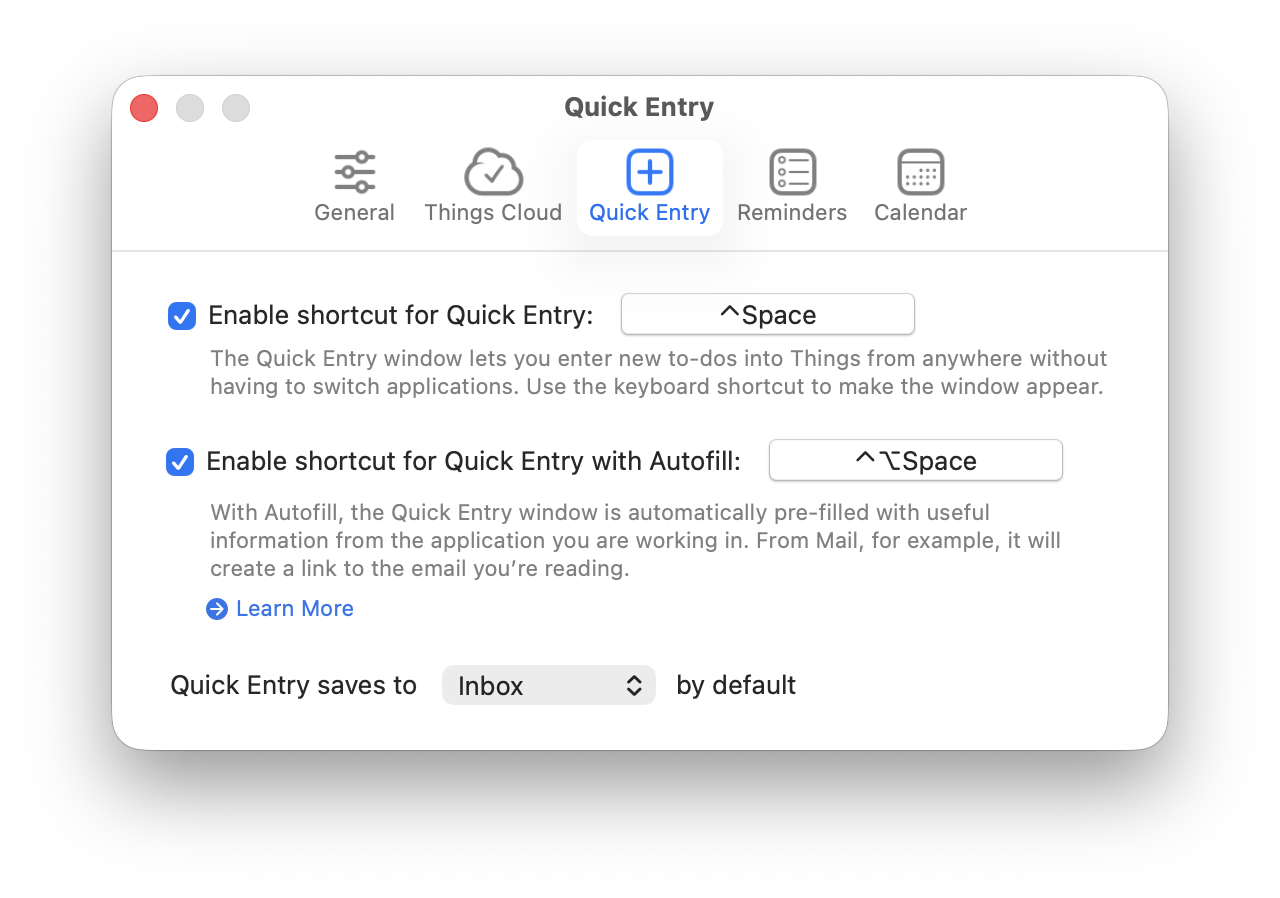
Typing the quick entry keyboard shortcut opens a small window to type the todo item, which lands in Things’ Inbox. I sometimes use ⌃⌥␣ (spacebar) to add a todo item with a uni-directional link from the todo item to an email I’m viewing.
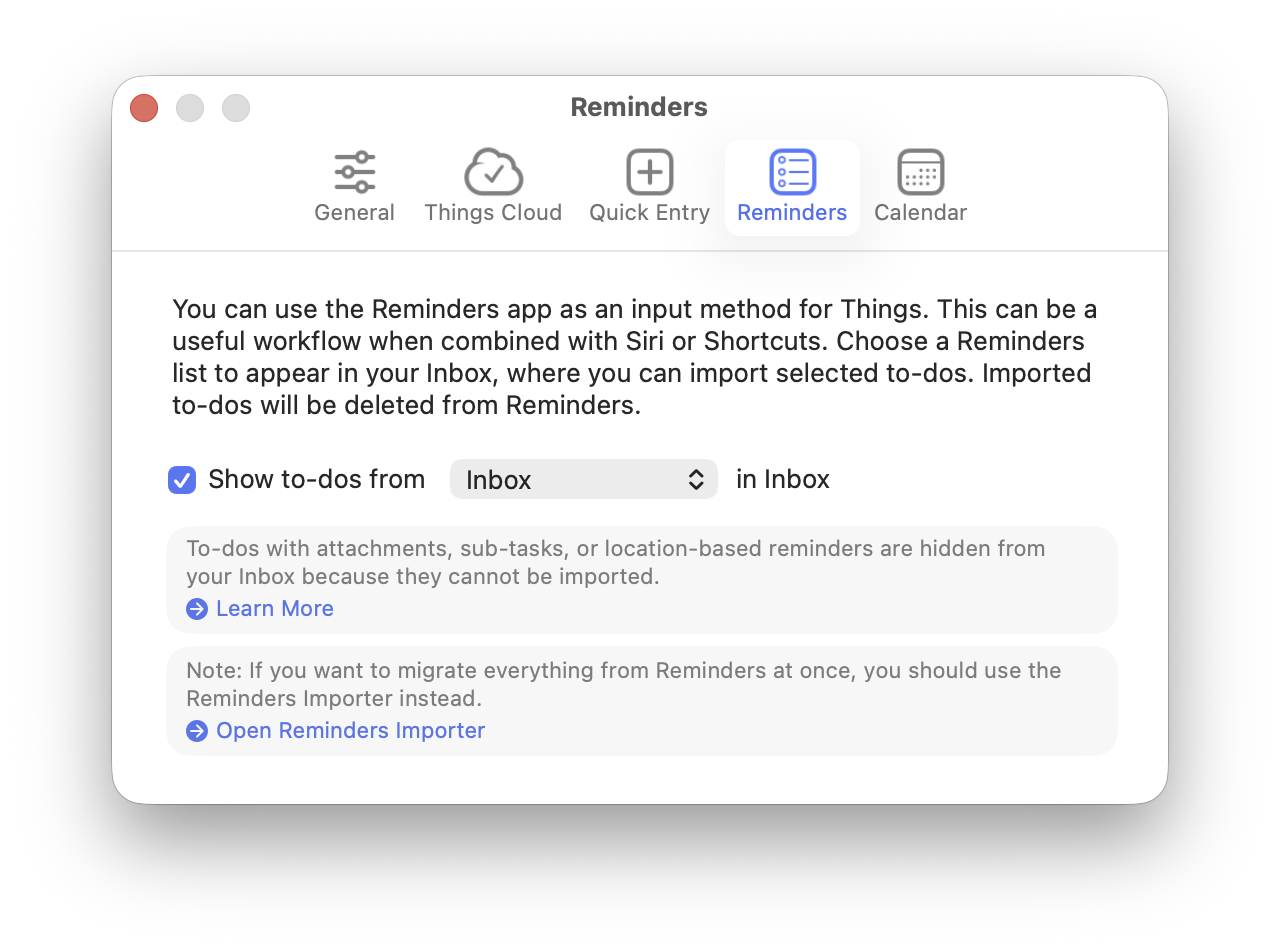
To configure Things to import from Reminders, choose the Inbox from your Apple Account in Things’ settings.
Hyperkey
Preferences for Hyperkey are simple—only one window. Here is my configuration.
Reminders
Because I hardly use any of Reminders’ functionality, its setup is quite simple. I configure Reminders with a default list, the Inbox.
Hookmark
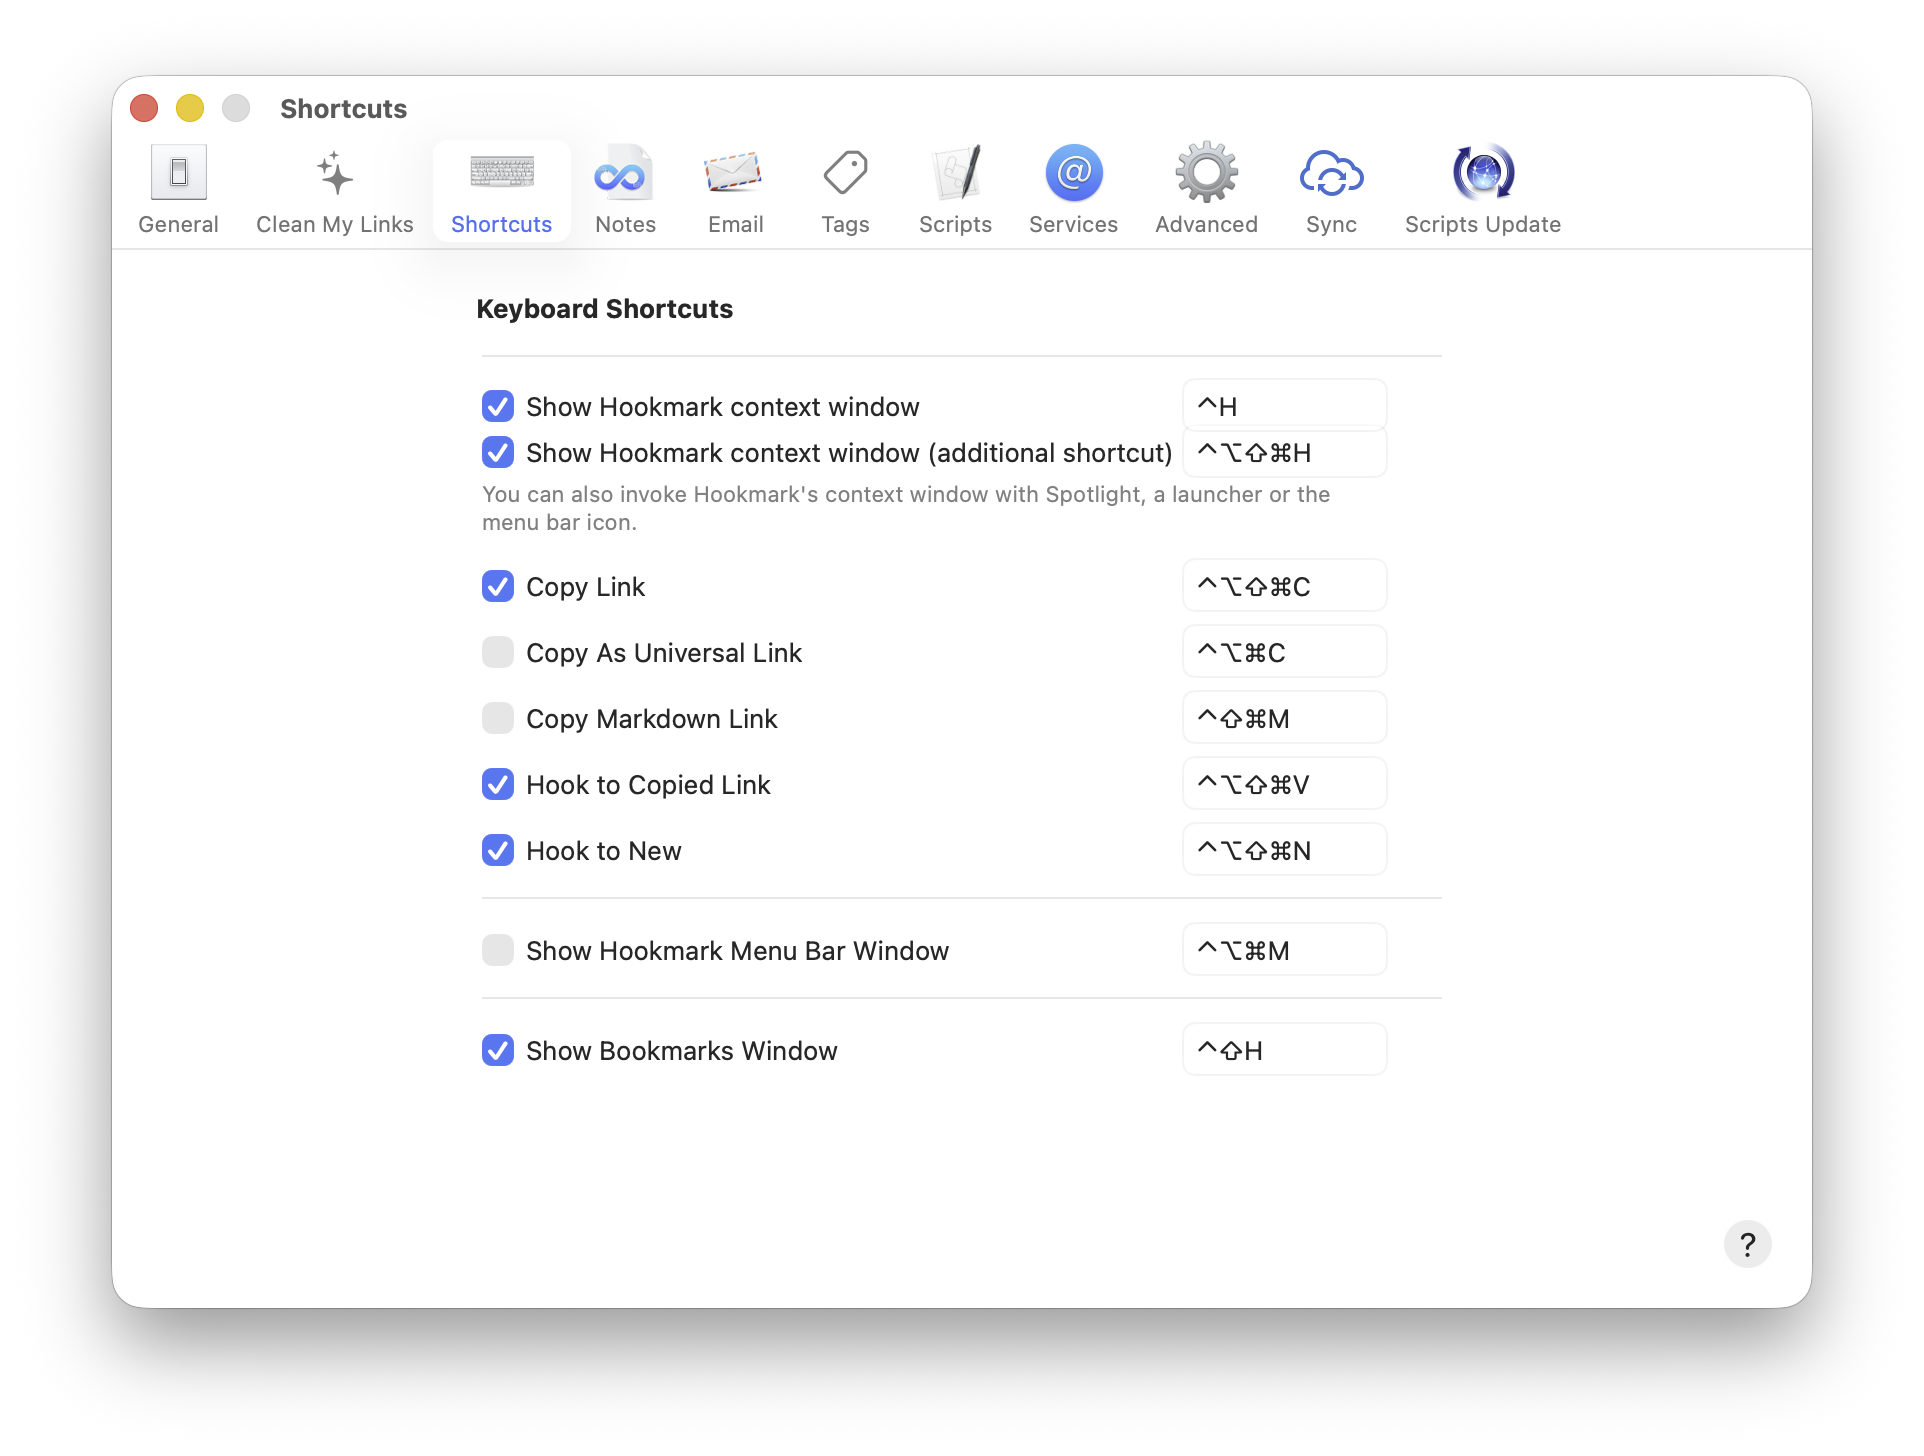
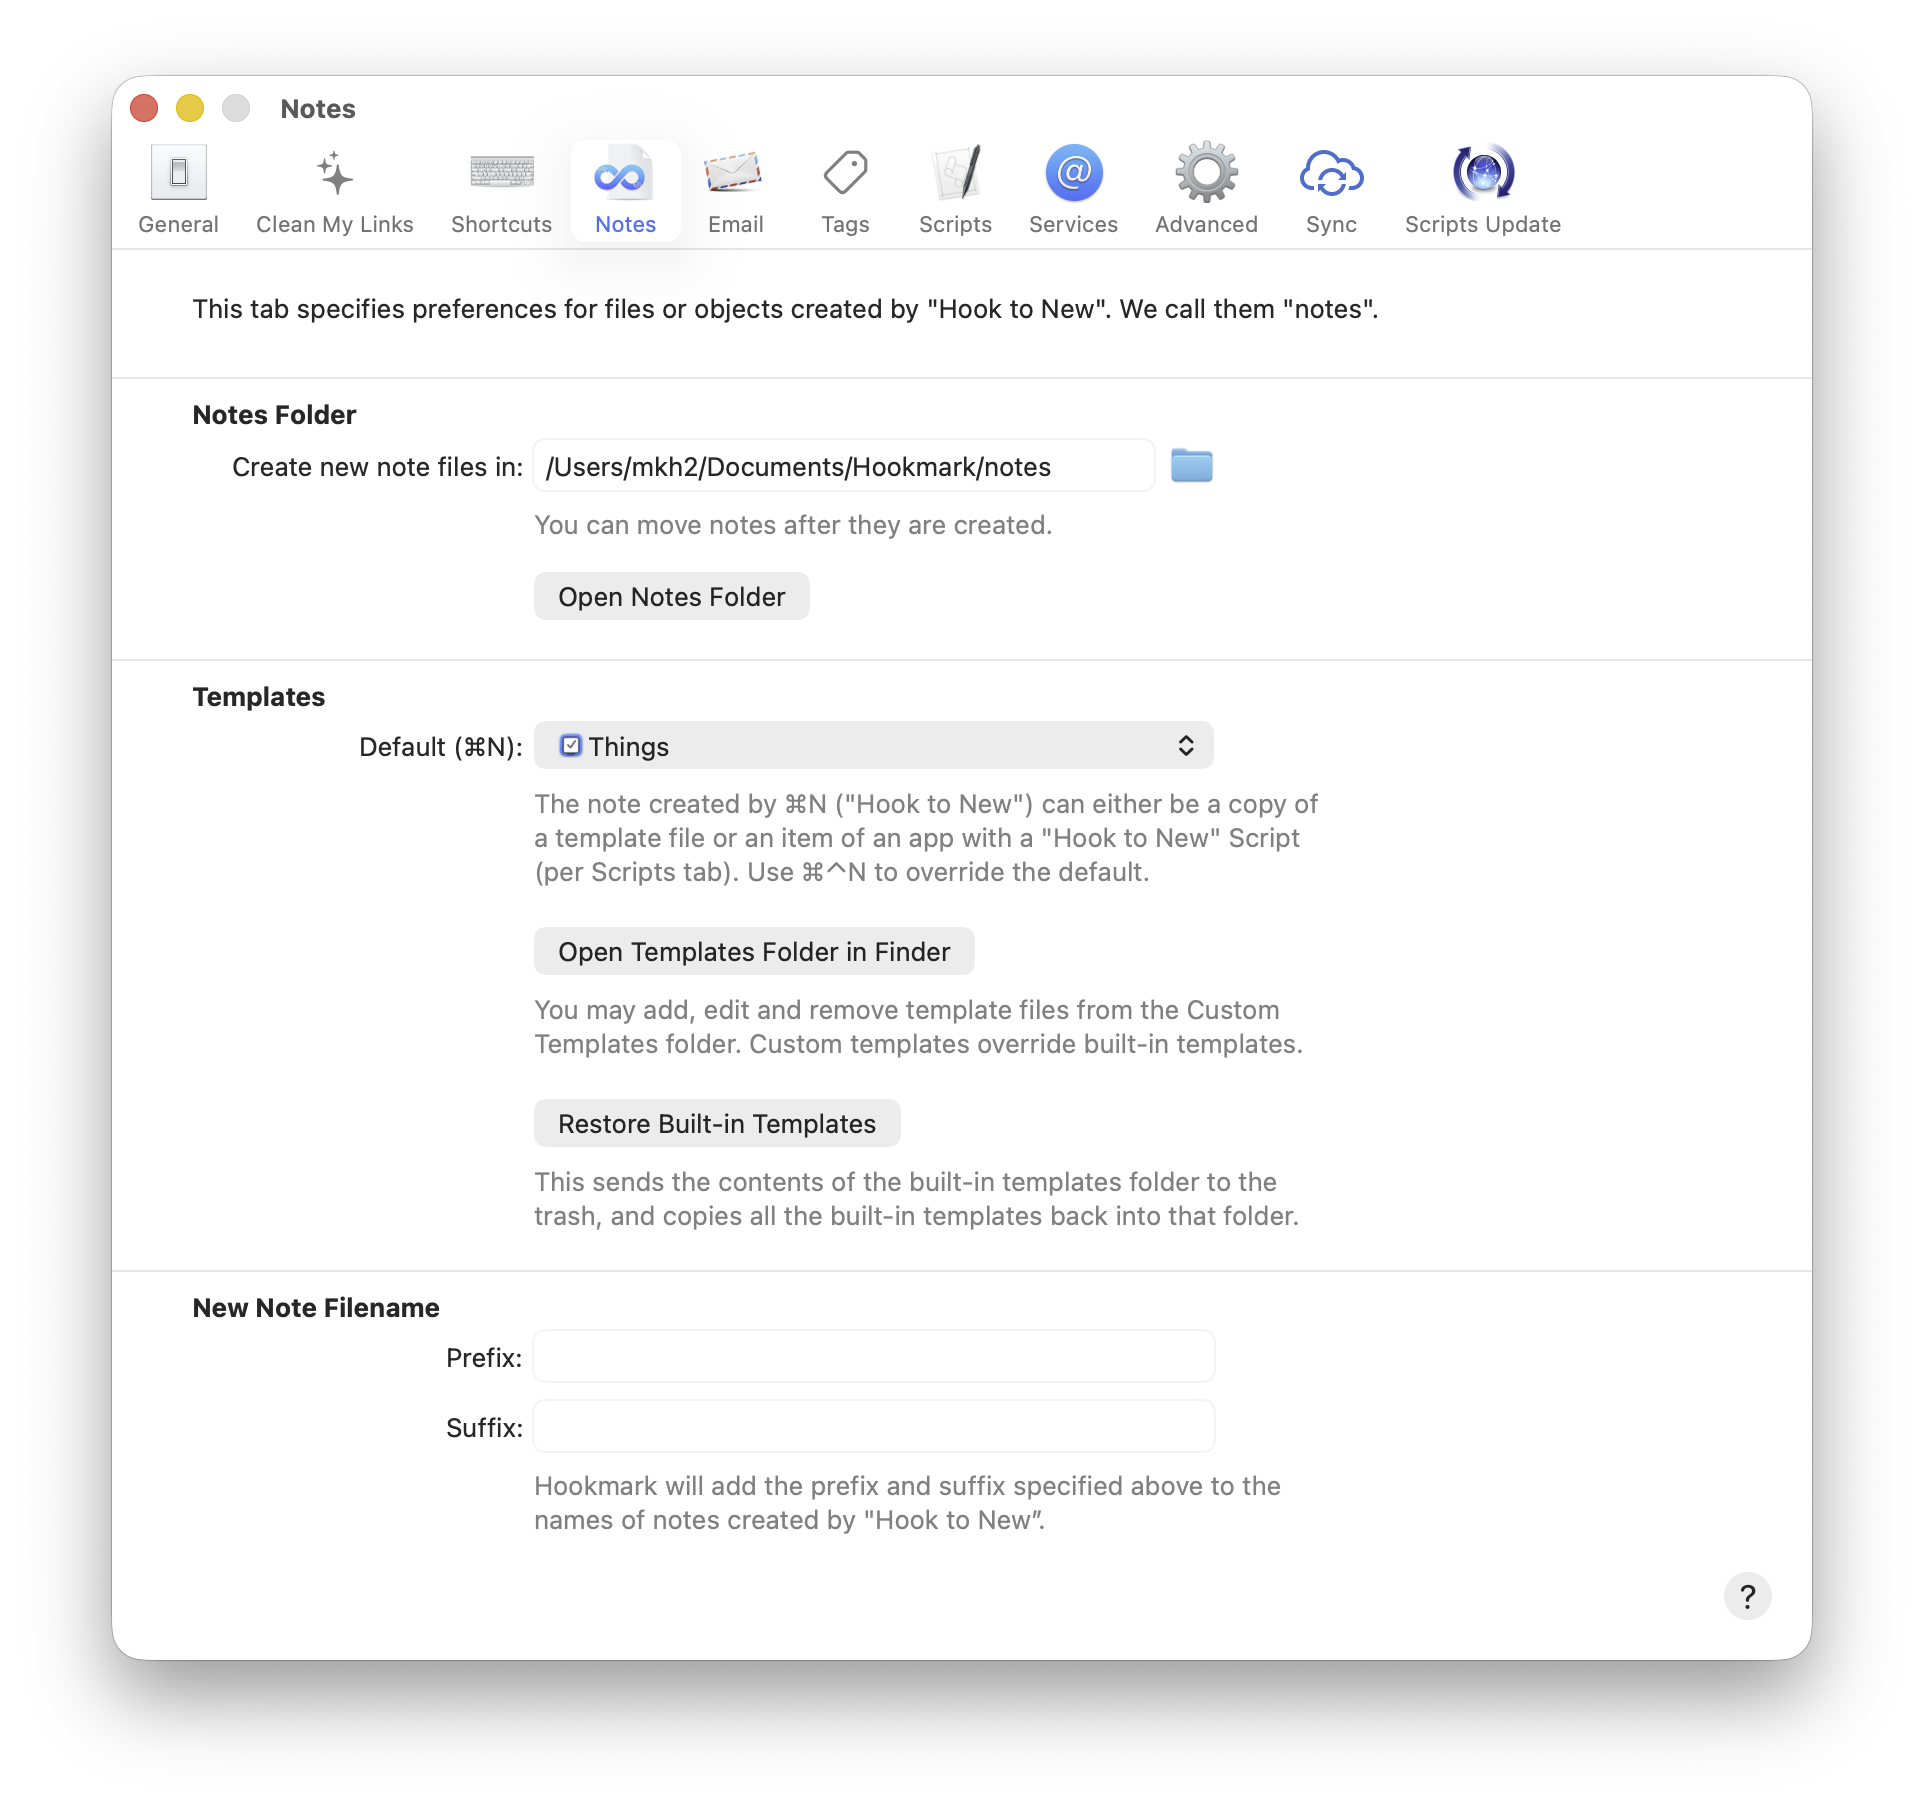
The important settings for Hookmark are (a) the keyboard shortcuts and (b) the type of item created with ⇪N.
The shortcuts pane of Hookmark’s settings is extensive. I set most shortcuts to use all of ⌃⌥⇧⌘, thereby enabling use of the hyperkey (⇪)!
To create a new todo item when you type ⇪N, set “Default: ⌘N” to “Things,” as shown below.
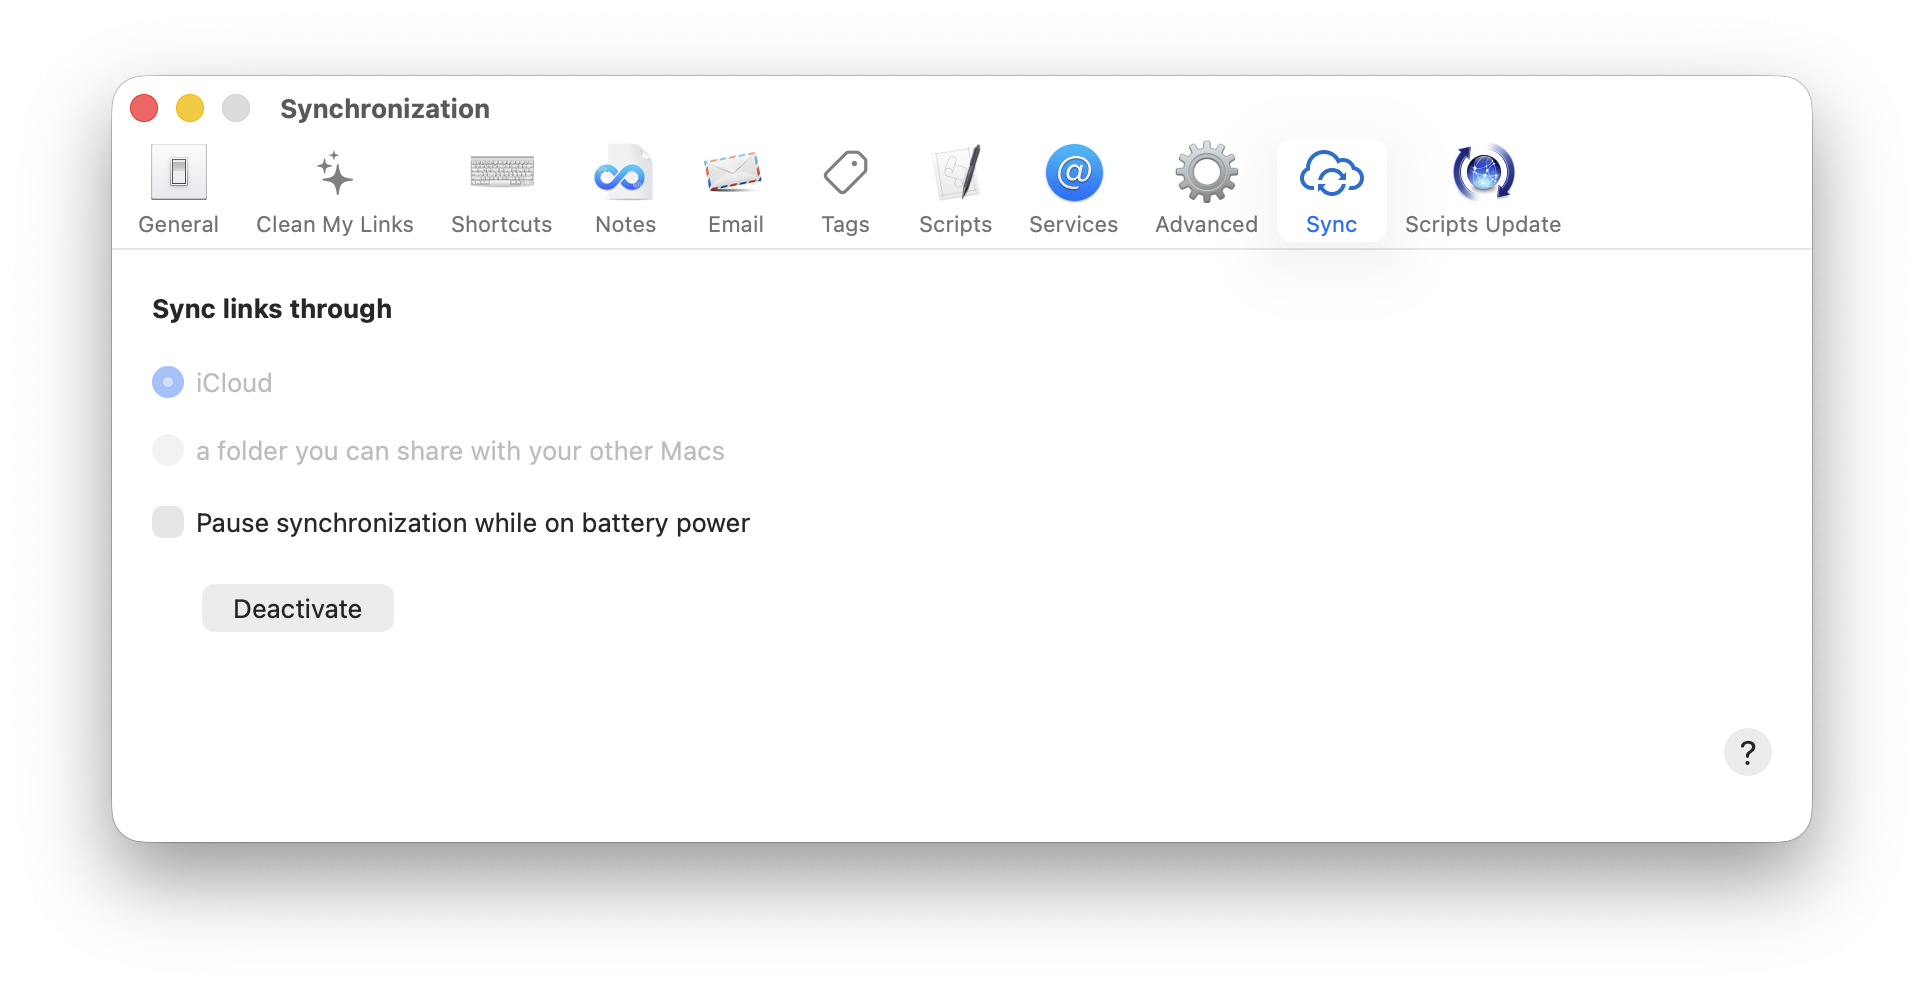
To sync Hookmark information across multiple Macs, configure the Sync panel of Hookmark settings as shown below.
Workflows
After configuring all the apps, let’s talk about how to use the (nearly) perfect todo system. I discuss several workflows below.
Work with a todo from an email on the Mac
Most of my todos are associated with an incoming email, viewed on one of my Macs. Here’s how I work with an incoming todo item from an email.
- First, I view the email in the Mail app.
- I type ⇪N to add a todo item to Things’ Inbox, hooked to the originating email. Things opens directly to the new todo item.
- Later, I go Things’ Inbox to see the task. I import the task and add metadata. (See below.)
- After importing the todo item, I select the task. ⇪H brings up a small window that shows the originating email. I type the down arrow key (↓) to reach the originating email and press ⏎ to open the message. Now, I can reply to the email.
- When I complete the task (by responding to the email), I can select the originating message in Mail, type ⇪H to bring up a small window that shows the associated (hooked) Things task. I use the down arrow (↓) to select the task and press ⏎ to open Things to the task. I mark the task as complete with ⌘K.
Edit on capture or import
During the capture or import process, I often edit todo items and add metadata in Things.
- I edit the title by selecting the todo item, pressing ⏎, selecting the title, and typing a new title. Pressing ⏎ again confirms the new title.
- I type ⌘S to set a start date or ⌘T for today.
- I use ⇧⌘D to set a deadline for completing the task.
- I use ⇧⌘M to set an area or project for the task.
All of this is possible without taking my hands off the keyboard! At this point, I can move to a different activity with the knowledge that I captured my incoming todo item.
Hooking a resource to an existing todo
I often hook a resource needed to complete a task to the task itself in Things. Examples include a document, a folder, an email message, etc. To add a hook (the bi-directional link), I do the following.
- I navigate to a resource needed to complete the task.
- With the resource selected, I type ⇪C to copy a hook.
- I switch back to the todo item in Things and paste the hook with ⇪V.
When I want to work on the task, I select the task in Things, type ⇪H then the down arrow key (↓) to reach the resource, and press ⏎, taking me directly to the resource.
Capture a task from an email on my iPhone
When I receive an email that needs action but I’m on my iPhone, I use Things’ “Mail to Things” feature.
- I view the email on my iPhone.
- I choose to forward the message.
- I type “Things” for the recipient, which expands to my “Mail to Things” email address.
- Send the email.
- Later, at my Mac, I import the task from the Things Inbox.
- Then I set metadata for the new todo (start date, deadline, area).
Unfortunately, there is no hook between the email message and a task captured in this way, but the email message is appended to the todo item in Things.
Work with a todo from a NetNewsWire article
I use NetNewsWire as my RSS reader. NetNewsWire works perfectly with my (nearly) perfect todo system. Here’s what I do.
- I view an article in NetNewsWire.
- I type ⇪N to create a todo item in Things hooked to the URL of the NetNewsWire article.
- Later, when I return to the todo item in Things and decide to read the article, I type ⇪H, use the down-arrow key (↓) to reach the hooked article, and type ⏎, which takes me directly to the article in my default web browser.
- I read the article.
- When I finish reading, I type ⇪H followed by ↓ to reach the todo item, and type ⏎, which brings me back to the todo item in Things.
- I type ⌘K to mark the task as complete in Things.
Capture a todo while out for a run
When out for a run, I often think of a new task or the next step for a project. I use the following steps to work with a task captured “on the run.”
- To capture the task, I raise my Apple Watch and say “Hey, Siri: remind me to edit section 2” or something similar5. I have found that “remind me to” is the phrase that deposits the remaining dictated text into Reminders’ Inbox.
- When I’m next at my Mac, I open Things and type ⌘1 to navigate to Things’ Inbox where I edit the todo item and add metadata. (See above.)
This workflow is possible, because I configure Things to use the Reminders Inbox. (See above.)
Capture a task associated with a document
When I’m working on a document, I can quickly capture a task with a hook to remind me to finish my work. Here’s what I do.
- I open the document for editing.
- I type ⇪N to create a new task in Things with a hook to the document.
- I edit the title of the todo item with a reminder of my next job with the document.
- I type ⇪H and the down arrow key (↓) to reach the document then ⏎ to go back to the document.
- Close the document and move on to the next task.
When you’re overrun by Today tasks
Ideally, the tasks to be done today are the only tasks in the Today view of Things. Unfortunately, that rarely happens for me. Occasionally, I’m overrun by seemingly (but not really) urgent tasks.
When I’m overrun, I move everything to the Someday list with the following steps:
- In Things, I move to the Today view (⌘2) and select all tasks with ⌘A.
- I type ⌘S to set the start date.
- I type “Someday”6 followed by ⏎.
- Then, I switch to the Someday view (⌘5) where I select the tasks I want to work on today.
- Finally, I move the selected tasks to the Today view by typing ⌘T. Typing ⌘2 brings me to the Today view where I can get to work.
Again, all of this can be accomplished from the keyboard of my Mac; no mousing required!
Conclusion
I hope some readers benefit from learning about my (nearly) perfect todo system. I’m grateful to the developers of Things, Hyperkey, Reminders, and Hookmark. Those apps are making my life just a little easier.
Footnotes
“Capture” is the term for pushing a todo item into the system, one way or another.↩︎
I currently use the Apple Calendar apps for calendaring.↩︎
I use Note Plan for note taking, mostly using the daily note feature.↩︎
Hyperkey can be configured so that quickly tapping (as opposed to pressing) the caps-lock key enters standard caps-lock mode. I recommend enabling the quick-tap behavior. Later, I show how to do so.↩︎
Note that I avoid saying “Hey, Siri: remind me mow the lawn on Saturday.” Siri interprets “Saturday” as the name of a (non-existent) task list in Reminders. Siri fails to save the task, because the “Saturday” task list is missing. Siri assists with task capture but fails at assigning other metadata for the task. Oh, Siri!↩︎
Actually, typing “So” is enough.↩︎